| Home | Job | Pinball | Photo Album | Automotive | Press/Awards | Contact |

See here for
Part 1 of Playfield
Renovation
See here for Part 2 of Playfield Renovation
See here for Part 3 of Playfield Renovation
See here for Part 4 of the Playfield Renovation (this page)
See here for Part 2 of Playfield Renovation
See here for Part 3 of Playfield Renovation
See here for Part 4 of the Playfield Renovation (this page)
Cleaning bulbs and sockets
There are dozens and dozens of bulb sockets on and under the playfield. Some are for General Illumination (GI), which means that their bulbs protrude above the playfield surface. Since these bulbs were removed for playfield renovation, bits of dirt and flecks of Magic Eraser have built up in them. Also over the years, corrosion can be seen on the electrical contacts inside the sockets.In order to clean them, I purchased a bulb cleaner stick from www.pbresource.com. However, after it arrived, I was disapointed to realize that it only cleans the spring contact in the middle of the socket, and not the insides of the barrel of the socket. This is because there is little abrasiveness to the sides of the stick, and there are no brushes to polish rust from an irregular surface.

Example of a dirty bulb socket. The inside of the socket has corrosion, and bits of Magic Eraser can be seen inside of it.
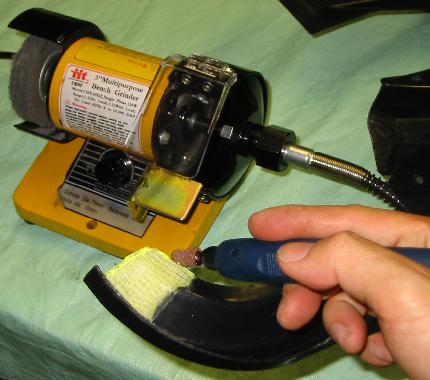
The sockets were cleaned with this modified Dremel tool in the handheld drill attachment for my bench grinder.
I looked for round small
steel
brushes made for handheld drills, but could not find any. The
smallest would not fit inside the 1/4" barrel of the bulb
socket.
As a result, I decided to modify another tool for the job.
The
original tool is a 1/8"
Steel End Brush purchased at Home Depot, which I spread out
into a
ball pattern with a needle nose plier. The result was
excellent. I could use the drill attachment to polish the
inside
and center spring with little effort. After a few minutes,
they
would both be shiny and rust-free. Before this treatment, I
could
get the bulbs to light intermittently by wiggling them in the
socket. Afterwards, they would burn slightly brighter, and
without flashing even when wiggled.

Example of a cleaned bulb socket. Although not readily visible, after buffing with
the steel brush, the inside of the socket and the spring are both shiny. This is
followed up by a burst of air from a spray can to remove debris.
Using the rotisserie, I
can tip the
playfield vertical to spray the rust and dirt out with my compressed
air can. After cleaning, it can be noticed that the bulbs
burns
brighter, and are not intermittent even when you wiggle them in their
sockets.

The underside of the playfield during the bulb cleaning process. Quite a chore! Note the grey oxidation
on the bulb sockets (cleaned off with the buffing tool), and the dark bulb glass (washed off with alcohol).
I also swabbed all the inserts as they had a thin layer of soot. Where convenient, I also wiped the soot
off the bottom of the playfield. The playfield tester made it easy to identify bad bulbs.
Finishing the clearcoat
After waiting three weeks for the clearcoat to dry, I sanded it with 1000 grit sandpaper, buffed it with my random orbit polisher and some rubbing compound, polished with Novus 2, and then applied two layers of paste wax.

The playfield after three weeks of drying. It is shiny, but not smooth. As usual, the freshly painted surface
has speckles of clear that feel rough to the touch.

After sanding, all the sheen is gone, but it is now smooooth.

After buffing with the rubbing compound, the Novus 2 and the paste wax, the playfield surface is done.
After waiting three weeks for the clearcoat to dry, I sanded it with 1000 grit sandpaper, buffed it with my random orbit polisher and some rubbing compound, polished with Novus 2, and then applied two layers of paste wax.
The playfield after three weeks of drying. It is shiny, but not smooth. As usual, the freshly painted surface
has speckles of clear that feel rough to the touch.
After sanding, all the sheen is gone, but it is now smooooth.
After buffing with the rubbing compound, the Novus 2 and the paste wax, the playfield surface is done.
This was my second
attempt at
painting
these targets, which are always damaged from years of use.
The first time
around, I used acrylics,
and the
paint rubbed off after a few weeks of play. Also, my accuracy
was
poor and the results reflected that. After a few weeks of
trying to think of ways to improve the touchup, I settled on printing
circles that were drawn in Visio (which allows precise dimensioning)
onto sticker stock, and
then cutting them as templates. These were then applied to
the
target. I then handpainted the circles by hand and a
paintbrush. This time I used "Fusion"
paint, which bonds to
plastic.

Example of a worn target. The ball strikes over the years have removed the paint from the
two outer circles. Due to the rivet in the middle, the inner circle is intact on all my targets.

The circle template after the unneeded circles were removed and then
applied to the target. It allowed me to ensure an accurate outside
edge on the circle. The inside edge is done free-hand.

The result of the touchups. Hopefully, I will do even better the next time.
Note the shine on that playfield.
Example of a worn target. The ball strikes over the years have removed the paint from the
two outer circles. Due to the rivet in the middle, the inner circle is intact on all my targets.
The circle template after the unneeded circles were removed and then
applied to the target. It allowed me to ensure an accurate outside
edge on the circle. The inside edge is done free-hand.
The template consists of
concentric
circles. Each circle's diameter is 1/8" larger than the
previous. By cutting out the correct one very carefully with
a
sharp pair of scissors, a template results that can aid in the painting
process.
The result of the touchups. Hopefully, I will do even better the next time.
Note the shine on that playfield.
The most important
lesson I learned
is to burnish the sticker stock down so that paint does not seep under
the edge. In a few cases, that was not done, and the outside
edge
on some circles needed to be rubbed clean. Other than that,
the
results were allright, although it is possible to notice the touchups
if you look closely.
Reassembly of playfield
hardware

Two tools that I used a lot were my finger ratchet and the adapter for my cordless drill.
This allowed me to remove and fasten screws very quickly and in tight quarters.

The lower part of the playfield with the two flippers, the ball saver post and the other hardware. Everything has
been sanded, polished, and new wear items (sleeves) have been replaced. Thanks to the playfield tester, I
was able to tweak everything and find problems from the comfort of the rotisserie.
Two tools that I used a lot were my finger ratchet and the adapter for my cordless drill.
This allowed me to remove and fasten screws very quickly and in tight quarters.
The lower part of the playfield with the two flippers, the ball saver post and the other hardware. Everything has
been sanded, polished, and new wear items (sleeves) have been replaced. Thanks to the playfield tester, I
was able to tweak everything and find problems from the comfort of the rotisserie.
Touching up the apron
Due to the frequent ball strikes, the apron gets dinged and chipped a lot. I found some Testor's Enamel (Gloss Dark Blue #1111) that is a good match for the blue area.

Touched-up apron with the Testor's Enamel. The chips were along the angle closest to the camera
and along where the ball travels. The match is very good.
Due to the frequent ball strikes, the apron gets dinged and chipped a lot. I found some Testor's Enamel (Gloss Dark Blue #1111) that is a good match for the blue area.
Touched-up apron with the Testor's Enamel. The chips were along the angle closest to the camera
and along where the ball travels. The match is very good.
The one tricky part is
that the
paint color seems to vary depending on how it is mixed. When
I
first bought the jar, there was some lighter colored pigment in the
bottom. When I initially applied a test patch without any
mixing,
the result looked darker than the apron. When the settled substance was
mixed into the rest of the paint, the color was slightly lighter than
the apron (when painted onto the blue part). However, after
the
paint resettled after a few days, the color match was almost
perfect. So the lesson is that the paint should be mixed and
then
a sample applied to check the match. Incidently, IPA
(alcohol)
was a good cleaning agent for the wet paint and brushes.
After a week of steady
work, all the
components have been reassembled onto the playfield. These
images
best viewed in a wide browser window (greater than 1300 pixels in
width).


The lower playfield. The left sling plastic was autographed by Gene Kranz (Apollo 13 fame),
and John Grunsfeld (Hubble and Shuttle astronaut).

Of course all rubbers were replaced and bolts and plastics were polished. All GI lamps were replaced with
cooler running #47 bulbs, but all lamp matrix bulbs were #44's.


The Shuttle toy is snowy white, and the bullseye targets are complete circles.
This is not normally the case with unrenovated machines.

After swapping out the playfield in my machine, I only had to make some minor adjustments, and all systems worked great.
The slings and pops had been adjusted just right already, and I did not need to work under the playfield very much.
As soon as we turned on power, we were amazed how bright the playfield looked.
Everything sparkled and looked new.
The whole project took about three months. It was a lot of fun to work on the playfield.
Too bad that I am done. Next project: pinball CPU tester.
Links:
- Other renovations
- A Space Shuttle playfield restoration (Dave Schulpius; with repainting)
- Space Shuttle playfield restoration, starting with a mylared playfield.
- Overlays
- The overlay in the middle of the Space Shuttle playfield.
- Vinyl overlay discussion on RGP.
- Source for decal paper.
- An extensive page on applying overlays and how they are
made (Pinballmagic).
- Mylar Removal:
- Removing playfield mylar on a Space Shuttle playfield.
- Using Goo-Gone on a Taxi playfield.
- Using Freeze spray on a Bally 1997 Eight Ball.
- Another Freeze
spray experience.
- Using a hairdryer/heat gun.
- Using "Sticky Stuff Remover" available in UK.
- Plastics:
- Reproducing your own plastics (King of Payne).
- Reproducing plastics (Wilga).
- Flattening plastics (Tip database).
- Plastic repair kits.
- Playfield touch-up and painting.
- Clever tricks including using a colander for the silk screen effect.
- Clearcoating a playfield:
- Clay's
method using Varathane Elite. The authoritative
guide.
- Using Crystal Clear Varathane.
- Discussion on RGP
regarding my clear coating project. Also this
concluding
series.
- Long thread with more clearcoating discussion.
- Another long thread beginning with a good summary of preparing a playfield.
- Varathane #200018 Water Based Diamond Elite Clear Coat (where to buy).
- Making
an
overlay file without a scanner.
Log:
- August 16, 2005 - Purchase of Playfield "B". This
will be
the playfield refurbished on this page. (Playfield "A"
is in the machine).
- August 28, 2005 - Completion of rotisserie.
- Thread that I started on RGP to discuss this device.
- September 3, 2005 - All parts stripped from
top of
playfield. Start of mylar removal. Initially with
Goo Gone,
then later with Freeze Spray.
- September 8, 2005 - Received Playfield "C. This unit is very beat up, and will be used for hard-to-find parts and practice of painting methods.
- September 11, 2005 - Completion of mylar removal on top part of playfield above Hubble graphic.
- September 16, 2005 - Some plastics and Shuttle toy renovation complete. Back to mylar removal.
- September 23, 2005 - Mylar and glue removed from playfield, start of touch-up painting.
- September 28, 2005 - Purchased a vibratory case polisher from crankyfarmer.com for $44+$9.
- October 2, 2005 - Playfield is ready for clearcoat.
- Thread that I started on RGP to discuss clearcoating steps.
- October 5, 2005 - Repair of ball ramps.
- October 15, 2005 - Start of clearcoating.
- October 22, 2005 - Final coat of clear applied. Start of hardware refurbishment.
- Thread I started to discuss conclusion of clearcoat.
- October 29, 2005 - Playfield tester complete.
- Discussion on RGP on this device.
- November 5, 2005 - Finished cleaning bulbs and sockets both under and above playfield.
- November 11, 2005 - Finished clearcoat final step. Reassembly begins.
- November 13, 2005 - Repainted S-H-U-T-T-L-E targets.
- November 19, 2005 - Finally done
with
playfield renovation.
See here for Part 2 of Playfield Renovation
See here for Part 3 of Playfield Renovation
See here for Part 4 of the Playfield Renovation (this page)
Main Space
Shuttle Pinball page
(c) Edward Cheung 2005, all rights reserved.