| Home | Job | Pinball | Photo Album | Automotive | Press/Awards | Contact |

Power Line Monitor
This node monitors the instantaneous current, voltage, frequency, and real power consumption of my home. Voltage is monitored with a dedicated miniature transformer, the current is measured using a home built current transformer that clamps around the incoming power feed, and the real power is calculated with an analog multiplier followed by a low pass filter to obtain the DC component (real power). These analog quantities are then fed to a 12-bit A/D converter driven by a '77 PIC. The circuit gains get me a resolution of 5 Watts. As a result I can even see the effect of turning on one lamp.

The power line monitor node. The two RJ11 connectors are the
home
automation network (top) and the current transformers
(bottom).
There
are also two BNCs to plug in my 'scope to see the voltage, current
and
power waveforms.
An important consideration with the selection of the ferrite cores is if they can handle the magnetic field of the power feed without saturating. I confirmed this with a small space heater that I had. This unit draws approximately 11 Amps, and by winding nine turns around the core I saw that the resulting output current was linearly proportional to one turn. However adding just one more turn (12 turns) resulted in a slightly lower output (per turn), indicating that the core had started to saturate from the magnetic field. This proved that the cores should be able to handle the equivalent of a single conductor passing thru its hole carrying 100 Amps of current.
By the way, these cores were just some that I had lying around. I do not know a commercial source for them. They appear to be similar to TV flyback transformer cores, so TV repair shops may be a good source. [5/01 Update: It turns out that this suspicion was correct. I found an identically appearing transformer here. The transformer that I used is in the center-top of the picture. Attempts to purchase small amounts of these have so far been unsuccessful.].

The current transformers. As is visible above, there are two
transformers in the
system, one for each power phase. Note that all parts that go
inside the breaker
panel are either tethered together or nonconductive. This
prevents
shorts should any
parts fall during installation or use. The ferrite cores are
split so that they can
be installed without disturbing the power feeds to the house.
This is done
by unscrewing the nylon thumb screws and separating the two halves.
Note that connection beyond this point is handled by RJ11 connectors,
and the
'burden'
resistors
inside the connector.
Calibration was performed by using an accurate clamp-on current meter, a DVM and a small electrical space heater. I first measured the voltage and current with the current meter and the DVM, noting the outputs of the A/D converter. I then turned on the space heater and measure the increase current. These two measurements (and assuming a linear system) allow me to calculate the gain and offset of the system. As mentioned above, each bit on the A/D results in a resolution of about 5 Watts.

The current transformers installed into the breaker panel.
The
two large black
vertical conductors are the two main power feeds. Note the CP303
signal blocker
(with the four screw terminals) installed around the neutral (silver
color) cable.
This view should provide appreciation of using nonconductive wing nuts,
if they should fall, they could touch the two large terminal blocks
attaching
the two main power cables.
Energy Analysis
The main home control program was augmented with support for this node. The data on power, voltage, current and frequency is displayed on the home status window. Any TV in the house can now turn to the home control computer channel and see the current power line stats. After only a few minutes of use, I could already tell the power consumption of some major appliances in my home, for example:- Refrigerator : 220 Watts
- Downstairs HVAC : 600 Watts (air handler), 3.6kWatt (compressor)
- Upstairs HVAC : 250 Watts (air handler).2.2kWatt (compressor)
- Sony 32" TV : 140 Watts
- Outside fountains : 100 Watts (for two pumps)
- Small space heater : 20 Watts (fan), 1.3kWatt (heating element)
- Home Automation PC : 40 Watts (monitor), 40 Watts (system unit)
Main System
The screenshot below shows the home automation system's main screen. Note the power node's data in the 'Utilities' box.
Screenshot of the main control screen. Note the data of the power node displayed
near the bottom. The heating system is shown to be running. The main
unit has a temp rise of 15.2F, and the Heat Pump has a temp rise of 27.1F.
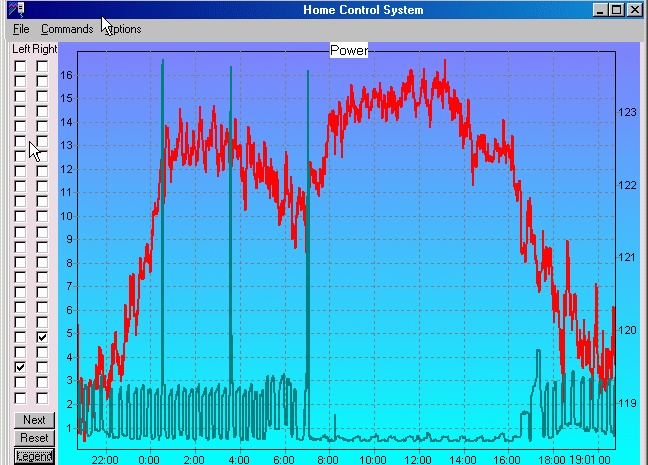
24 hour graph of the power data. Voltage is in red (right
vertical axis) and power (left vertical axis).
The large spikes are the defrost cycles on the heat pump, the 2kW
ripple is the heat pump compressor.
The user can position the cursor anywhere on the data to read the
actual value.
During the winter of 2000-2001, I was able to estimate the source impedance that the house sees from the power company. The line voltage changed by about 0.75Vrms when the power draw of the house changed from 3.5kW to 20kW. This translates into a source impedance of about 5.5milliOhms. Thus (measured at my breaker panel inside the home), the power company looks like a 5.5milliOhm source. Most of this is probably the wiring from the breaker panel to the neighborhood transformer (about 100 feet).
I am making circuit schematics and source code available for this project (for noncommercial use only). I hope you will write to me if you build your own version of my power node.
Links:
- Source code in C. Using the CCS PIC C compiler.
- Schematics in Adobe pdf format
- Off-the-shelf current transformers, including split-core and innovative flexible core units. Thanks to Arthur Hoey, NY
- Off-the-shelf current transformers. Thanks to Carl Hunsinger.
- Another source of split
core
transformers. Thanks to Duco Weytze.
- Flyback transformer cores. Including picture of unit identical to the one I am using.
- Commercial single outlet power monitor (Kill A Watt). Here and here.
- Off-the-shelf snap-on cores.
- Commercial whole-home monitor with graphing software.
- Low cost ($7) Hall-effect current sensors. Thanks to James Jones.
Long term update and log
- This node was installed on July 24, 1999.
- September 29 1999. Added an additional current transformer attached to an RJ11 jack for the generator current monitoring. By unplugging from one current transformer to the other, I can monitor power from the generator.
- November 23, 2000. Estimated the source impedance of the power company at 5.5 milliOhm.
- January 12, 2001. Added energy integrator in the software. This allows me to find out the total energy consumption over a specified period. This will be used to find the optimal operating mode of the upstairs HVAC system (heat pump).
- May 28, 2001. Power node working without a hitch.
- May 26, 2003. With the complete rewrite of the home automation system, I used the Kill-A-Watt meter (above) to calibrate the output of the power node. The commercial unit has a stated accuracy of 0.2%. In addition, I was unsatisfied with the diode-based peak detector in the current measurement (D1 in the schematic, and modified it by adding a spare op-amp. Currents are now measured down to 0 amps). The schematic was updated.
- July 28, 2003. Found Split-core AC current sensors on digikey's website (part number 341-1052-ND) for a picture, click here.
- Another source of split core transformers here (by Jeff Noxon).
- A complete fly-back transformer is part number IF313C8 from Brigar (by ericmagaha.at.adelphia.net).
- January 2005 - Energy analysis (see above).
- July 2013 & July 2015 - Energy analysis from my energy provider shows a favorable performance for our home, which has rather standard windows and old central air conditioner units. So it is possible to be energy efficient without all these costly new features.


(c) Edward Cheung, 2009