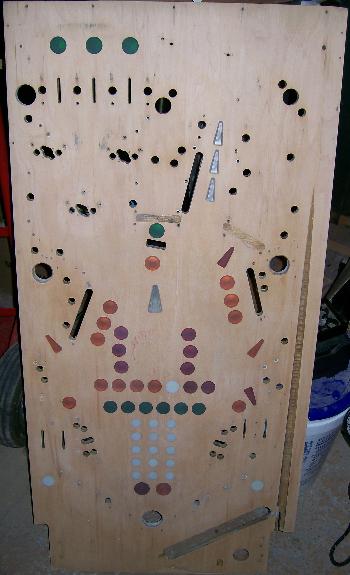
Space Shuttle playfield sanded down to wood.

Another example of sanded playfield (photo courtesy Dana).


Peel the backing off by keeping the transfer tape flat.


|
Keith N. writes: I'll send you pics when we're done, but I thought I'd send these over so you can see how I painted around the inserts before I put the overlay down, and there is a (bad) pic of the overlay after it was coated with varathane. I think it is a definite must do - it makes the edges of the overlay fit seamlessly against the cut out holes - like where the ramp raises shield hole - you would never be able to tell it was an overlay just looking at that area. |

| One thing I did before attaching the overlay was to place a sheet of tracing paper over the empty table, locate, and label all the holes. Once the overlay was installed, this was my guide on where I needed to pierce the overlay. |
| Date:8/12/08 Ed, I started by making a custom table to lay the playfield in. The table essentially has no "top" but has a cutout area for the playfield to fit in flat. The table has 4 leg levelers in it to adjust so that the playfield is perfectly level, which I leveled with a small carpenter's level on the playfield. I sanded it completely smooth, and started it off with two coats of polycrylic. I then applied the Text, followed by a soapy water solution then the overlay. I could move the overlay around with little effort, and then pushed out all the water. It took about a week to dry in my hot garage- during that time the clear insert areas went from cloudy (soapy water) to clear with the exception of one are in the "S" part of USA. For some reason it had a partial area that remained cloudy. It isn't very noticable, so I left it as is. Sanded the overlay with some 800 grit, and followed up with Naptha. Then came the first light coat of polycrylic. I followed this up with 5 coats of polycrylic applied heavy. My goal on each coat was to "Spray until it was smooth, not orange peel" This proved to give it that 'milky' color, which dried clear. After the last coat I let it dry for 3 weeks. The end result was very smooth and level, With no block sanding needed. I ended with a hand Novus polish with novus #2, and a good waxing (3 coats) with Carnauba wax. Then the fun began with reattaching everything!! I was very happy with the results. I didn't know how the the polycrylic would adhere or look in the end, but I see no issues. It plays great! >Question from me: > How did you apply the insert text? What I mean is how did you know > how to center it in the insert. I ask because the previous person > that sent me pictures ended up with the text not quite center in the > opening of the overlay. As a result, I modified my instructions to > use a plastic sheet to copy down the location of the openings. Did you do that? Ed, I used a variation of that. Instead of plastic, I used a thick tracing paper. The paper had all my screw holes punched in there as well. Looking back on this, I don't think there was any other way to do it. You have to use the holes on the overlay as a guideline for centering the text. I could have centered the text on the inserts themselves, but the registration shifts slightly once the overlay is applied. On another note, I had two triangular inserts that would not line up exactly the the overlay windows. I think there is some variation from playfield to playfield that you just can't possibly account for every manufacturing tolerance. By the way, did you notice I used your space shuttle toy stickers as well? I stripped the stickers and epoxied the holes. I also used an old PCB blank I had laying around, and traced/cut it to fit the underside of the shuttle. Then epoxied that into place. It really stiffened it up. Then I lightly sanded the shuttle, and used the Krylon white for plastic paint. Applied the stickers, then sprayed the whole thing down with a light coat of Krylon triple thick. Worked well. |
| Hi There Edward, Please find attached some pics during the restoration. I disasembled all the top parts and choosed to not remove all bottom parts but rather pull the switches and so on down and leave attached. The light sockets and varoius holes i put foam into during sanding and clear coat applications. I sanded down the playfield to be carefull to only remove the paint and found the paint remival a good judge of how much to sand. I applied two coats of clear, applied the text, and then the overlay and cut out the holes with a hobby knife. I did not paint around the inserts prior to the overlay but would consider this to be a wise decision. Most of my inserts did line up with the overlay , with small wood areas visible on extra ball insert, lock inserts, open inserts and 20000 spot shuttle insert. I touched these up with black paint and then applied two coats of clear over the overlay to seal. You would not be able to tell that these inserts were touched up and the results were very good. I only had one text that was placed a little low for the overlay and that was the left spot shuttle insert. After the overlay was finished i began the assembly process. |
(c) 2010 Edward Cheung, all rights reserved.